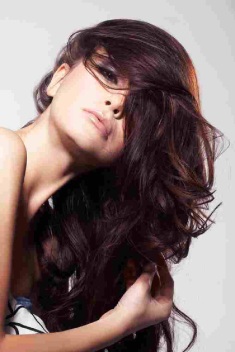
Hair Tutorial: Summer Waves

Hello Hair-nistas!!!!!!

Recently I’ve received a ton of emails regarding this particular hairstyle I do along with many women approaching me complimenting my hair. I’m extremely flattered and I had no idea how popular this particular style has become, yet many women have no clue how to do it themselves. It’s fairly easy but slightly time consuming if you have extensions or really long hair. Anyhow, I want all my hair-nistas to look fabulous so a tutorial is in order!

The hairstyle is called “Summer Waves”. Now, this is not an official title and I’m sure there are many names for it, but it’s the name I’ve coined. I tend to name all my hairstyles because I’m crazy and that’s what I do…lol

Summer Waves

Summer Waves (Front View)

Summer Waves (Back View)

As you can see from the photos above the waves are very tight. The smaller the curling iron, the tighter the waves. Usually I use a 1 1/4 inch barrel curling iron to do most of my hairstyles, which gives a loose wave effect. On this particular occassion I wanted to try something different so I used 2 different curling irons. First & foremost I only use Hot Tools curling irons (gold barrels). In my opinion they are the best and I’ve used their curling irons for years. The Hot Tools curling irons are priced between $30-$40 and you can purchase them at your local beauty supply store or order them online at www.amazon.com.

Hot Tools Curling Irons
3/4 inch curling iron
1 inch curling iron

Fusion Energy of Beauty Finishing Spray

For the Summer Waves hairstyle I used a 1 inch barrel and a 3/4 inch barrel curling iron. I alternated each curling iron making sure to curl away from my face. Also, spray each strand of hair with a medium hold hairspray before and after you curl. I used Fusion Finishing Spray because it was on sale and I’m a sucker for a good deal. It actually worked really well and I just bought it again. I purchased it at my local Sally Beauty Supply store.

To create a wavy look you have to turn the curling iron upside-down and wrap a strand of hair around the outside of the barrel. Do not open the curling iron. Hold the strand of hair with your fingers at the bottom for about 10 seconds then slowly release. Be careful not to burn your fingers with the curling iron as I have done many times before. I suggest wearing a winter glove of some kind.

Curling iron should be closed facing downward. Hold hair at tip. (Used 1 of my hair extensions for demonstration photo lol)

Now for women who have clip-in extensions I suggest curling your hair extensions seperately from your natural hair. This will create a more dramatic look and the waves will stay longer. I stick the top part of my hair extension piece in my dresser draw and close it tightly. Then I sit on the floor and curl my extensions piece by piece. The dresser draw works great! It holds the hair extension piece in place and I can pull the hair while wrapping it securely around my curling iron. I’m also able to watch t.v., check emails, twitter, facebook, instagram, etc…

Using my dresser draw to hold extensions while I curl them…

Hair Extensions (Before seperating waves)

While I let my hair extensions set, I begin to curl my natural hair the same way. I leave my bangs straight and only curl the very ends allowing them to blend in nicely with the rest of my hair. Before I apply my extensions, I run my fingers through the waves making sure to seperate them. Apply a smoothing serum and lightly mist extensions with hair spray. I do the same process to my natural hair, then I apply my extensions. I play around with my hair once all the extensions are in securely. Flip your head upside down, seperate the waves a little more, fluff the hair up, and voila!!!!! Big, polished, Summer Waves!

Model Shot!

I did my best friend’s hair in waves using only the 1 inch barrel curling iron. No extensions, all natural, only took 30 mins.

One of my clients – waves done with a 1 1/4 inch barrel curling iron. 22inch hair extensions added also.

The best part of this hairstyle is that it will last you about 2 days!!! All you have to do is add a little smoothing serum and go! The waves will loosen slightly but the hairstyle will look effortless.

Let me know if you try this hairstyle and if you have any tips of your own. I also welcome any hair tutorial request as I love trying new styles!!!

10 Hair Tips Your Mother Never Told You

Here are a few hair secrets I have locked away in my little beauty closet. When I die I can’t take them with me, so I figured I’d share these gems with you. You’re welcome in advance…lol. Happy Wednesday my lovely Hair-nistas!!!!

1. Bye, Bye Flyaways – Hate those little stray hairs that stick up on your head or around your face?? Go to your laundry closet & grab 1-2 fabric softener sheets, rub them gently over the top of your head whereever the flyaway strands exist. (Yes, I’m serious it works!)  Also, when you’re lotioning your body & have a little lotion left on your palms, just run your fingers through your hair. Two products I love for flyaways – Sunsilk Hairapy Hydra Tlc 24/7 Creme ($9.99, amazon.com) & Garnier Fructis Style Sleek & Shine Anti-Humidity Milk ($4.00, drugstores). I apply Sunsilk Hairapy Hydra Tlc 24/7 Creme before I blowdry my hair. I only apply a quarter-size amount to my ends & a dime-size amount to the front of my head, where flyaways are common. I use Garnier Fructis Sleek & Shine Anti-Humidity Smoothing Milk when my hair is dry. I apply a small amount throughout my hair & on my extensions. It smoothes away all stray hairs. Both products smell amazing too!

2. Paper Towel Power – After you get out of the shower do you use a regular bath towel to dry your hair? Believe it or not, using a paper towel to gently remove water from your tresses absorbs more water & prevents frizz.  Your hair will end up less frizzy because the paper towel does’t create as much friction as a bath towel.

3. Slow Down On Protein Products – Protein – enriched products are all the rage right now. What consumers don’t realize is that you can put too much protein in your hair causing the hair to become dry, brittle, & weak. A deep protein treatment should only be used once every 2-3 months.

4. Use Your Tootbrush On Your Hair – Sometimes the hair around your crown area can become extremely flat & lifeless. Many women reach for a comb & immediately begin back-combing their hair only to look in the mirror & find Snooki from  The Jersey Shore staring back at them. Also,  using a comb to tease hair actually rips your hair strands causing major breakage. Use a toothbrush to gently back-comb the hair around the top of your head. This will create volume & lift without ripping your hair to shreds.

5. Use Hot Rollers for Hollywood Hair –  To create big, soft Old-Hollywood curls opt for a hot roller set.  Using hot rollers promotes healthy hair because the heat is not as harsh compared to using a large barrel curling iron. Hot rollers create smooth, silky hair while eliminating all frizz. I use Jilbere de Paris Ceramic Tools Porcelain Series Professional Hair Setter ($21.99). It comes with 12 large rollers & you can buy more rollers seperately if needed. I bought mine at Sally Beauty Store.

6. Finding the Right Hair Color for YOU – The trick to finding the right hair color is to complement your skin’s undertones. If you have:  Pink/Blue Undertones – Use deep browns, reds, or blonds. Choose ash, golden, or honey highlights for added contrast & depth. Yellow Undertones – Use a deep, rich base color, such as mahogany, dark chocolate, auburn, or chestnut. Get highlights in shades of deep copper, red, cinnamon,  or burgundy. These colors will help neutralize the yellow in your skin. Red Undertones – Try not to over process your hair by going too blond &  going too dark. Stay away from a yellow or golden hair color also. Stick with a honey brown or golden base color. You can add rich, caramel highlights for a sun-kissed appearance.

7. Never Tell Your Stylist You Want Bangs – Usually when a girl says she wants bangs she really means, “I’m hormonal, I’m having a bad hair, I hate everyone & new bangs will make everything better.” Try to overcome that impulse feeling for at least a week & if you still truly desire bangs, talk about it throughly with your hairstylist. Not everyone views bangs the same so be sure to bring a clear photo of the look you want.

8. Use A Humidifier – Hair is constantly exposed to dry air, heat styling, etc., causing our beautiful tresses to become parched hay-like strands. Using  a humidifier at night will distribute needed moisture back into your hair reigniting healthy, full, soft locks.

9. Love Your Scalp – Too much product build up on your scalp could be the reason your hair is a slightly unruly. This could slow hair growth, clog hair follicles, &  weaken hair strands. Use Sea Breeze Astringent ($5.00, drugstores) on your scalp. Apply with a cotton ball, then wash your hair as usual.

10. Olive Oil Isn’t Just For Cooking –  Indian women always have soft, silky, thick hair. What’s their secret? For centuries Indian women have been using olive oil to treat their tresses. Olive oil works as a natural conditioner. It helps to make your hair softer & more manageable. You can also add fresh rosemary to the olive oil. Rosemary is well known for its tonic effects & is also a natural conditioner. It is best to use room temperature extra virgin olive oil. Use your fingertips to apply the olive oil throughout your hair, starting from the scalp working your way down to the ends. Wrap your head in a towel & let set for 30 minutes. Sometimes I leave it on for an hour for extra conditioning. Wash the olive oil out of your hair, shampoo & condition.

What are your hair secrets???? Feel free to leave comments with your own hair tips!